Showing posts with label Tutorials. Show all posts

Sunday, October 6, 2013

Brokentooth's Guide to Goblin Greatness: Cowardly Giants. & A Review of Foundry's Giant

What the snag? Huh? Ack! You youngins still here? I'd just nodded off to a nice sleep and some kobold lasses were just about to.. oh nevermind that now.  Small use to be king of the goblins when you can't drift off for a well deserved nap.  I've completely lost my caravan of thought.  

Seeing a few dozen gleaming red eyes looking up at him anxiously, he continued.

Alright then.  We'll talk more about the biggest and best fighters you can muster! 

"Orcs?" piped up a bent-nosed scraggler.

Ack! No! Spit those orcs! They're no good and that's fer sure. You don't want them around unless you want no food or shiny bits for yerself when fightin's done.  They's a greedy lot who completely exaggerate their own worth. 

No, one of the best biggest is giants.

"You already told bout them!" hacked the bright goblin girl.

Oh. Yes, that's right, I did. But I didn't talk about the best giants: the cowardly giants!

"How's a coward good for a fight?" asked an uncommonly dense stupid boy.

Oh someone kick him! And quit interrupting! Cowards are great for fights! Any fool can go charging off waving a sharp stick and caterwauling at the enemy.  A coward knows enough to do what's smart to keep himself alive.  Just threaten them enough so they know it's safer not to run, and they'll fight smart. Now, you don't want all your army fighting smart, or you have to feed and pay them all.. you want a good amount to die so you save more valuables for yourself of course, but you also want to win and for that you need cowards!  

"But won't they be afraid to fight?" asked the uncommonly dense stupid boy.

Brokentooth let out a heavy sigh.

Yes! That's the point! That way they'll kill the enemy before they can get to them to fight! 

Brokentooth figured he'd keep an eye on that boy, and put him in sharp stick caterwauling training.

Some giants are such thorough cowards they've become exceptionally good at rock throwing! 
Like Trolls that throw rocks, only they can throw even bigger, heavier rocks. Plus the enemy can see them a good way off and it scares the breakfast out of them! 

......................................

When I saw the giant from Foundry, and I was ordering some paints, I figured I had to get one to add to my goblin army! 

Technically, it is called a Troll, but they are such big, tall gangling trolls, they're really more 'giant' than 'troll'. 

The one I picked out, to be either a Giant in the army, or a Stone Thrower, was this one: 

So I'll walk you through the unpacking & assembly process: 

Tutorial:


Here are all the parts. It is a very big kit. 
The first thing I noticed as a potential problem is heavy parts with small contact points. 


The connection for the foot however is a very large deep tab.  Nice.


Stands up on his own without a problem.


The waist looks like a pretty deep contact point, but the connection isn't very flush.


It needs to be filled either at front or back, depending if you want him hunched forward or not. 


The wrist: that's not sufficient in my opinion for a solid bond.  The fist weighs more than most minis.


The rock-hand is worse. I'd not advise just gluing and expecting it to hold with a bit of knock around.


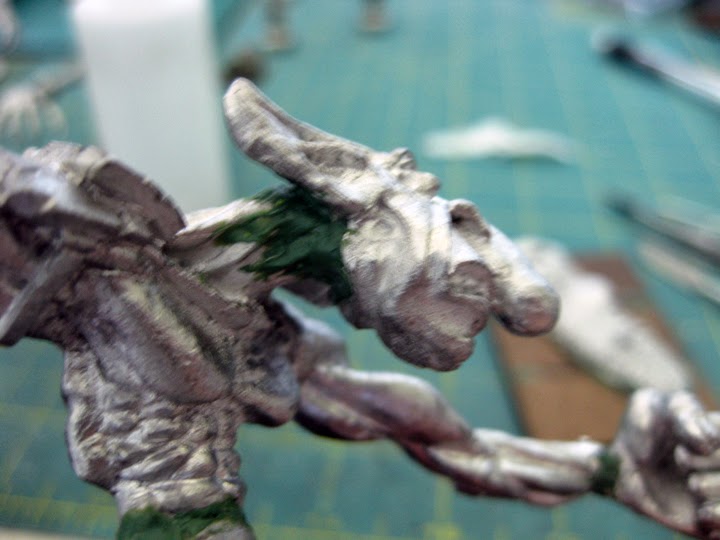
There was also some miscast to the mini: part of his side didn't fill, so I filled & resculpted with green stuff.


So I got out the dremel and sank some very deep pins.  
You could use a hand operated pin vice, but that's a ton of work.

Using deep pins also allowed me to extend the head out on a longer neck and angle it to look more where he was aiming his rock throw.


After a pin connects the hand & arm, filling will be required.


Almost done!

All the pinning and gluing has been done, and a base made for him. 


The contact at the waist seemed a poor match.  I bent him forward, so sculpted the gap in his back.


Since I'd made a longer neck to angle around to see where he was throwing, I also needed to sculpt some more to his neck.


All the filling & sculpt work is now done.


Special Delivery! It's a Rock! 
Oh! I ruined the surprise.


And the wind-up...


Posing with his 'little' rock-throwing troll buddy. I love the variety! 


And he'll serve great as an additional combat giant instead of a catapult if I need.

Review: 

This is a massive kit with a ton of character.  I just love the result.

As you probably gathered however, building him was a ton of work.  
I would not recommend this miniature to a novice. If you don't feel confident in pinning and simple sculpting of gaps you might want to practice on less expensive miniatures than this one first. 

I'd also highly recommend using a dremel or other electric drill for the pinning: this would be a serious pain with a pin vice.  I have a dremel flexible shaft extension, model 255, which lets you use a smaller 'pen grip' which makes things so much easier. 

So, it is a miniature that requires extra time & work, but I think it is easily worth it. 

More Goblin Mayhem to come! 

Monday, September 23, 2013

Tutorial: Test Your Paint Schemes with Photoshop instead of by Brush

Since I do more painting for clients than I do for myself, and probably will continue to until the day comes when rent is free, pizza grows on trees and airlines let you fly out of the kindness of their hearts, I have found testing out paint schemes by use of Photoshop to be a handy resource.  Often I can see the color scheme I have in mind, but describing it in words to a client is never as clear as a picture.

This can be an issue for anyone painting for themselves as well.  Have you ever thought a paint scheme, a color combination, would be great.. until you paint a test piece (or worse a unit) and then decide you hate it?

That's where programs like Photoshop can be very handy.

So I thought I'd share a few simple pointers to push you in some directions to experiment with, if you're not familiar with them.   Now, if your computer doesn't have Photoshop.. I've had it on every computer I've owned since the early/mid 90's, then there is a freeware program called Gimp that is supposed to be pretty similar.  I have it on my travel computer but haven't used it for anything except simple photo adjustments when traveling, so you'll have to try that out for yourself and see if that's your only option.

Painting & repainting a miniature can be very time consuming, and could gunk up your mini.

So if you have a scheme in mind and can find a picture of the mini, or a similar one, painted then have at it in Photoshop to see what your possibilities are!

Mona Lisa: Italian, or Alien? 

I'll give you an example from a client's project I'm working on now. 
He wanted a Khemri team: Blood Bowl Egyptian Mummies, but rather than the traditional Dark Lapis Blue & Gold, wanted something different, but wasn't sure what. I described a few options, but decided showing was easier than describing. 

First, I found some pictures of the minis painted, eliminated any background and opened in Photoshop. 
I've already lightened & desaturated the blue in this picture, but I'll explain how to do it. 


Here's the first image after I adjusted to lighten the blue. 
Photoshop assumes you are treating the entire picture unless you tell it otherwise.  Sometimes that is fine, if not, I'll explain how to single things out in a moment. 

Click on 'Image' at the top, scroll to Adjust and find "Hue/Saturation".  This is really easy. 
You can also use "Color Balance" but you do have less control with that, but it can be handy too. 

"Hue" will change the color. See the rainbow band at the bottom? That's how Hue will change things, slide that indicator on the Hue line and it will 'scroll' through the rainbow, altering each color in proportion to what it starts with and where you drag it to. 

"Saturation" will make the color more or less intense.  At the most it will make it blindingly solid, at least it will bleed all the color out of it. 

"Lightness" like it sounds, will lighten or darker the tone of the color. 


Here I just wanted to see what they'd look like if the team was called the "egypt easter bunnies": a nice baby lavender color. Notice since I'm adjusting the entire picture's color even the metal has changed from gold to a baby blue.  Luckily in this example, the bones have almost no color, so they don't change much... but if having started with green skin orcs, they would have.   In this example I changed the Hue a lot, and increased the saturation for the more bold 'easter egg color' look. 

By the way, don't click 'colorize': all that does it treat the picture like a black & white photo that you then tint the entire picture with the color you select.  A fun effect, but not much use for testing paint schemes. 

OK, let's say you master this real quick but you want to target color changes. 
On the tool box column at the left side is a lot of handy little tools.  For this, the most useful is the 'Magic wand' and the 'Lasso': they're both next to each other, second row from the top: I circled them in Red. 

The magic wand will select everything near where you click within a parameter set by you. 
Easier to just take a look:


I decided to add some alien color to the vegetation. I used the Magic Wand, and you can see the 'Tolerance" is set at 40 right now (look under the top bar where it says 'select'). The larger the number, the less fussy it will be about how much like what nearby stuff is to what you clicked on. 

I wanted more vegetation. So I clicked the darker trees above this spot, but more was close in tone to that and it selected too much, so I lowered the Tolerance, and went around clicking more. 

Now, important, to add to what you already selected, hold down the 'shift' key while you click, and it will add. to subtract, hold down the 'alt' key.  Easy.  You can also use the Lasso in the same way, just draw around whatever you want.


OK, got a healthy grab of dark trees now. Notice I had to lower the Tolerance, because at 40 it wanted to grab her dress, and I think she'd have gotten mad.  Now lets change the colors. 


This time, since I have just part of the picture selected, any adjustments will only alter the adjusted area.  
This can be very useful when changing colors on minis pictures when testing out a paint scheme idea. 

I decided purple trees would be fun, and brought the Hue to change them to purple.  It made them too bold to my eye, so I also lowered the saturation. Now she's a proper alien lady from another planet. 

Best advice: poke around, experiment, and you'll see what you find useful. 

You'll find a ton of Photoshop tutorials online, but I thought it might be handy to see an application for minis and how easy it is to do. 

Here are some other paint schemes I created this way for the Egyptian Skeletons, to see what the schemes would look like: 


Give it a try, you might find it useful a relief of some wear & tear on brushes. 

Saturday, August 11, 2012

Galacteer War Rocket: Review & Tutorial

Time flies.  I was very surprised to realize it was almost a year ago that I did the first review of a War Rocket faction, the Zenithians.  I still have to do a full review of the Pirates, but at the moment, let's take a look at the signature fleet, the Galacteers from Hydra Miniatures.

The Galacteer faction is the shining protagonist of the setting: Earth's finest, protecting our planet from the multitude of dangers in space. In design they show their evolution from Earth's aircraft.  They are the second most maneuverable fleet in the game, outclassed only by the Zenithians, but they're a bit sturdier than Zenithian.  The Galacteers seem a good fleet for someone who enjoys flexibility of movement over a 'stand firm and exchange punches' style of play but without being a complete 'glass cannon'.


I bought the fleet pack deal, which comes with 9 Class I rockets and 3 Class II rockets. 
While I do have 'full' fleets including Class III & IV rockets for Zenithian, Imperial & Pirates, the Galacteer and Valkyrie fleets I've only bought the intro fleet deals.. for now. 


Opening the pack and arranging the parts, this is what we find. 
The Class I rockets are single cast, and the Class II have separate dorsal and ventral fins. Unlike some of the other fleets, there isn't any easy tell by engines or fins to identify the classification of the ships, but the size differences are distinct. 


Unfortunately I did find a few casting errors in the set.  Here are two Class I rockets, with the one on left hasn't had the nose filled completely. I had to use green stuff to build it out.  


A miscast thruster pod on a Class I wing.  Again, repairable, but still regrettable. 

The flight stand attachment works the same way as the other fleets: the hole is bigger than the stub on the flight stand, best to cut the stub off, and attach with a bit of green stuff to get a tight fit. 
As seen on the Zenithians:


Just for added balance on the table I add weight to the base by gluing in extra metal from cut bases and tabs of other miniatures. Save everything and you'll find uses for it.

And the fleet is assembled:
I have used a few taller flight stand stems from GW kits, to give some height variety.  

I don't have any Class III or IV rockets for this fleet yet, but they look like this:
Galacteer Class 3Galacteer Class 4

Eventually, since I'm a completest, I'd like to have higher Class ships for this fleet than just the I & II, and Hydra Miniatures did just have a sale, and I was very tempted. I am still indecisive though,because I really do like the Class III (teh 'X' wing design is quite cool) but not crazy about the Class IV for some reason.... the wide hull loses the aesthetic to my eye.  And since I have three fleets that have Class III & IV rockets, I'd realistically need the same for Galacteer and Valkeeri, but I'd rather have two Class III Galacteers than a Class IV... so would that mean I'd be ordering a Class III & IV for Valkeeri and three Class III for Galacteers?  That started adding up to more than I can spare at the moment... especially when I wanted some of the Retro Raygun and little plant aliens too.  So I'm holding off on the higher class rockets for these two fleets for now.  

I have in mind to run a multi-scale game at a game con next year, where each player would command a small fleet of ships, all trying to race to, and prevent others from reaching, a planet to send down a small strike team to obtain an ancient artifact.  The game would have space combat as well as warrior vrs warrior action on the planet surface.  Different human, alien and robotic factions in a free for all.  
So I'll be painting the Galacteers up as squadrons in accent colors of Blue, Red & Green with a Class II and three Class I rockets each.  

Additional Uses:

It's always useful to consider what additional uses miniatures you buy might have, beyond your initial intention.  The Class I rockets would make nice 'near future' fighter aircraft for example, and would work well in a game like Epic 40k.  The Class II rocket would make an ideal 'Luxury liner' in any space combat game.  With all the round windows down the side, looking a lot like a passenger jet or cruise ship, it could easily stand in for a civilian space liner that needs to be protected (or raided) in any spaceship game, like Battlefleet Gothic, Full Thrust or Firestorm Armada.  

So how do I rate the Galacteer fleet? 

Rating:

Casting: 7/10
Cleverness of design: 9/10
Aesthetics: 8/10

Thanks for reading! 
Enjoy!

Friday, May 18, 2012

Building a Beach for Bear Booty: Tutorial

Now that it's getting warmer,  it's time to head to the beach for some bear booty!

... sorry, couldn't resist the pun ;) though it might be appropriate- my girlfriend still thinks it's scandalous the bears don't wear pants!

But I didn't have a beach for my last LPL entry, Dread Pirate Roe Bear, so I needed to build one.
I took pictures as I went so that I could make a tutorial, so if you've forgiven me for the pun yet, on we go...

I decided to make more than I needed for just the picture, so it could be useful in gaming.
Luckily, the main piece comes in a 2 foot by 4 foot section: pretty useful for the short edge of a standard gaming table, or could be used on the long by covering some of the edges of the beach to make a lagoon.

What you will need:

* Plastic covering for fluorescent light fixture: 2ft x 4ft, crackle pattern, or other pattern that is not uniform
 - don't get a geometrical pattern like a grid or diamonds. Anything too uniform will look wrong.
 - I got mine from Home Depot, cost about $6
* PVA/ white glue.
* Sponge flock ground covering, I used Woodland Scenics (color to match your desired gaming surface)
* Sawdust
* Snow flock, type sold by Gale Force 9 or GW is fine.
* Paint: Blue, Turquoise, Jade
* Optional: Airbrush: could do without, but much easier with one.
- Remember: with an airbrush work in a well ventilated area and use a mask at minimum, I use a Niosh 3M respirator filter mask.

Be careful with the plastic sheet: it can crack pretty easily.

The goal:

Caution: Paint the underside: the smooth flat surface.

You'll want a few shades for the water. I wanted a bright Caribbean Blue, so I picked a range from light jade through blue-green to indigo blue. You might want paler or greener water, depending on what type of ocean, sea or lake you want to represent, just be sure to have several shades.
Start by painting the lightest color, here a light blue-green, in random crossing wave lines:
Don't bother painting the entire thing, leave about 1/4 of the top unpainted, since it will be covered by land.

Next give a thin coat of darker blue:
Airbrushing does dry quickly,but do give it time to dry between stages.
Add a darker color to this as you go down (heading out to sea).  Don't make it too thick of a coat though, you want to leave some visibility for the next stage, where I add some Indigo:

Starting to take shape,but not quite there yet. 

Next flip it over to the textured side and apply PVA glue, slightly watered down, where you want the beach.
I used a medium sized cheap house paint brush for this. 
Make the beach line a bit wavy, so it's not straight across.

Apply the sawdust to the area of glue:
No need to go all the way to the edge. Sawdust is very cheap (read: free) and works fine. If you want to spend more time and money you can use sand texture paste or make your own and paint it, but I think this works pretty well and costs a lot less considering the amount of coverage.  And it worked well for my time constraint: 1 day before the LPL pictures were due ;) If you want to paint the sand to be lighter at this point you can. 

Next add the grass covering to blend your beach section into your game board.
Same method as above with glue for the beach: 
If it is a bit patchy don't worry too much, since laying it on a gaming board will darken those spots and blend it in fine.  Give the ground a few coats of matte spray varnish to help it adhere. 

Finally, add a few white breakers.  Mix your snow with white glue to a thick paste and place it for waves:
Give the snow many hours to dry. That is the longest part of the process.

Now it's ready for some rocks, lichen seaweed, whatever you want to place on it for gaming.
You can make better and more realistic beaches with a lot more time and materials, but to my mind this is a pretty good effect for fast & cheap :)
A 2 foot x 4 foot beach: 
Cost approx. $7.50. 
Time: 1.5 - 2 hours
Teddy Bears' Booty on the Beach: Priceless. 

Enjoy! 

Related Posts Plugin for WordPress, Blogger...